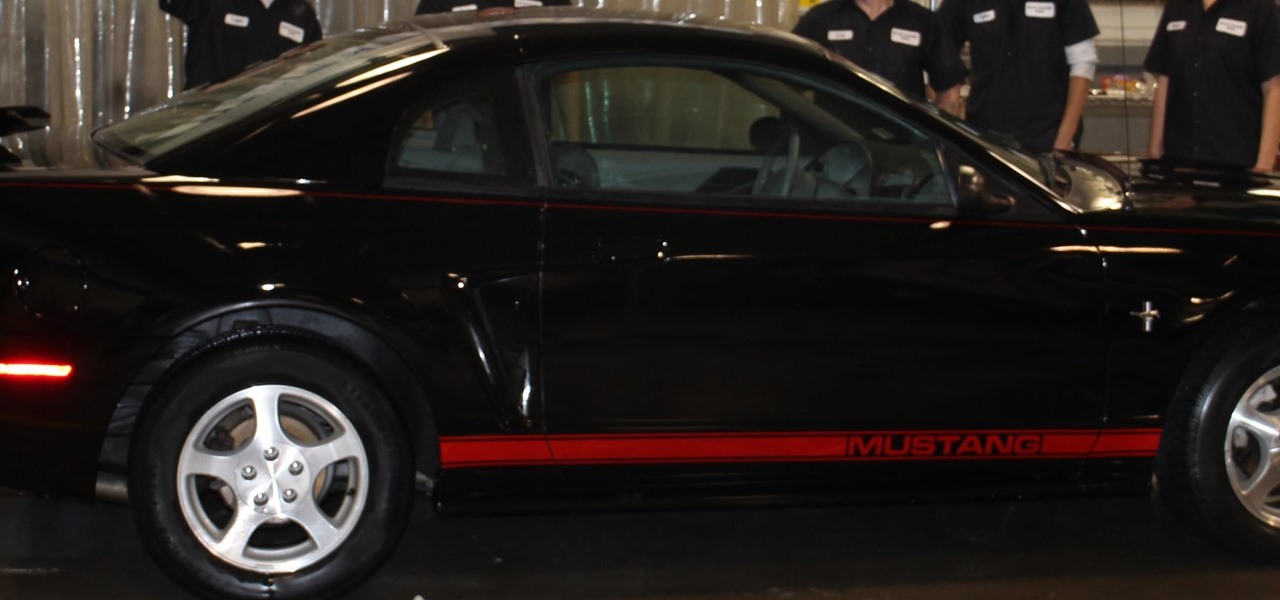

Follow along and watch the steps we took to spray the Eastwood Mustang project with primer sealer and base coat.
If you have any problems playing the video I have included the transcript to the video below.
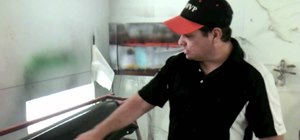
- Would you like to learn more about applying base coat and primer sealer? Well, that's exactly what we're gonna do in this video. Hey, YouTube, this is Donnie Smith, and welcome to another Eastwood video series. This is the video series where we're taking the Mustang project and we're going from start to finish, step by step, showing you how we painted this car. We changed colors on it, and we're almost there, we've almost got it. We've got it in the booth and we've got it masked off. We're about ready to get started spraying. We have got this car in the booth. We masked it in the previous video, then we wiped it down our final time, tacked it with the tack cloth, and now we are ready to spray. And what we're gonna do in this video is we're gonna apply some primer sealer and we're gonna apply some base coat. And one thing I wanna mention. Notice we've cleaned the booth, we've cleaned the car really good, but something that a lot of people overlook is yourself. A lot of the dirt that ends up in the paint job is from the people spraying it, so make sure before you walk in the booth that you spray yourself off really good with compressed air. And then also notice after getting in the booth, we're putting on paint suits, and this not only helps keep the chemicals off your skin, but also helps keep from getting dirt that may end up in the paint job. It could be some lint off your clothes, or it could be a hair off your arm or something like that, so paint suits really help provide a cleaner paint job. They can get a little hot, but they are well worth it. Now, we are using an Eastwood paint gun. Eastwood provided us this paint gun and the products to use for this project. It's a 1.4, and we've had good luck with all the products and the spray gun at this point, so. What we're doing now, we're about to start spraying, and with a downdraft, I think it's best to spray from the top to the bottom, 'cause that's kinda the movement of the airflow. Now, he's spraying from the outside in. Some people disagree with that. They say you should always on these top panels like the hood roof spray from the inside out just to help keep from dirt getting in there so you're not spraying against wet paint. But this method is a wet method, to keep a wet edge. And that's the way I was taught, and I've had pretty good luck with it. And that's something to keep in mind, and that is that not every painter's gonna paint the exact same way. I know some painters get so tied up, or body men or whatever, "That is not how I do it. "That's not right." And that's not necessarily true. There's a lot of ways to do it right. You don't wanna do it wrong, but there's a lot of ways to do it right. There's a lot of ways to do it wrong. But your method may not be the best method for somebody else, so... With the students, I show 'em how I do it, I show 'em a lot of videos, and kinda let them develop their own method. In the end, if you become a painter, you are, you're just gonna kinda develop your own style, your own methods. How far do you hold the gun? That's gonna depend on the painter. You hold it a little bit further away, which I do recommend beginning, 'cause you have more control. If you hesitate for a second, it's not gonna run on you. But if you hold it further away, you're gonna have to move slower. You hold closer, you're gonna have to move faster. So, I generally recommend to start out a little bit further away, and as you become comfortable, then you can start getting closer to the panel and moving faster. But what we're doing here, we're applying epoxy primer. It's Eastwood's epoxy primer mixes one to one with catalyst. And we're putting one coat on. And what this does, if there's any metal spots, it's excellent for corrosion protection. It also works as a sealer. Like the primer spots and areas that are a different color, this makes it one uniform color, which provides good hiding for whenever we go to apply our base coat. And now we've got it applied, it dried, and we are getting ready to apply the base coat, but first we're just going around. We're tacking it off again. If there's any dirt, we wanna be sure and denib that at this point to remove that. Dry spots, we did have a few dry spots. We remove that. And that's something to keep in mind during these stages. You can do that. Once you get to clear coat, you really can't, but the sealer and base coat, if you have some problems, go ahead and take care of it. If you have to apply a little more, fine, but it's better than having a dry spot or dirt that ends up in the finished product. So, we're just going around, making sure it's ready, and now we are gonna start applying the base coat. This is Eastwood's Boulevard Black, mixes four to one. And it mixes with an activator. Like the paints we're usually using is a reducer, but the difference with this is it gets hard. It'll harden up in your gun, you can't save the paint, so it is an activated base coat. And we're gonna put two coats on this, because we've got a good ground coat with a sealer, and this paint is very good hiding. Two coats, that's gonna cover well. Now, if it was a silver or something that has less hiding, we may put three. But for this, this works well. And I'm gonna go over these products. I thought about doing it during the video, but I didn't want to make them too long. That's why I sped it up, of course, too. I think I'll go over the products themselves in more depth in another video to keep these videos from being too long. And notice that he's doing a little bit different technique, like I mentioned. One of the videos I show is John from House of Kolor. He has a little bit different style, but I do like what he says, and he talks about being a robot. If you can do the exact same thing every thing, same overlap, right angle, if you think like a robot, that's what you wanna do when you're spraying. But what he's doing from the previous whenever they was doing the primer sealer is he's doing the whole side, and I personally prefer doing panel at a time. I think I can do a better job that way, unless I'm doing like a candy coat or a pearl coat or something like that, and then you really have to do the whole side at one time. But if you do this method, you need to learn how to walk with it a little bit. A little bit harder, but, again, this is gonna be a preference. I'm not saying my way is that right away. What I'm saying is to try different ways. Try painting the side at a time, try doing one panel at a time, and see what works best for you. So, don't be afraid to experiment with that a little bit. I think probably spraying and welding, you really have to get your own feel for it, because it's gonna depend on your technique, your skills, to determine what works best for you. So, don't be afraid to try new things whenever you're working on cars, spraying, welding, or whatever. Everybody's gonna have to do that fine-tuning according to their skills. So, what you wanna look for, if it looks great, well, obviously it's working for you, but if it doesn't, if it's not working out right, try something different. Try what does work well. So, we are putting another coat of base coat on here. And keep in mind, I'll talk more about the flash times and all that in other videos, but there are flash times with all these products, so be and sure and read the technical data sheet for the products that you're using. So, we are getting the second coat on here. And another thing I wanna mention right now is, see how he's putting the hose back behind him? That keeps the hose from getting into the paint. And a lot of dirt comes from the hose. Be sure and tack the hose off, and then whenever you're done, like if you have to go fill up with paint, don't throw the hose on the ground. Kinda hang it up somewhere, just to keep dirt from getting on that hose, 'cause a lot of the dirt comes from that. So, we're talking about it, and maybe I did mention or recommend or tell him to try panel at a time, 'cause it's been a long time since I had this footage, so I can't remember, but he is doing a panel at a time now. So, maybe he just wanted to try both ways, but we're doing this final coat of base coat and he's doing each panel separately. But the most important thing about spraying, in my opinion, is to work on your distance and speed, and your overlap, and also your angles. Make sure your gun angles are right. But that's probably one of the hardest things to learn that I see students have problems with, is their distance and speed. For example, if they're far away like me, I'm kinda short. A lot of times over a hood or a roof panel, I have to shoot a little bit further away in the center, so I have to slow down. If you get closer, like where you can reach good, I'm gonna have to speed up. So, make sure that you adjust your speed to the distance you are, and that's just gonna take practice. You're just gonna have to get out there and do that to kinda master that. And also your overlap. With this solvent that we're using, they recommend 50%, so you overlap each pass 50%. And I've noticed even in this video that that's off a little bit. It all works out. This car is gonna look awesome when it's done. I mean, it turned out really good. Never think that you're good enough. I mean, you wanna be confident, but you always wanna looks for ways to improve, how you could become better, and never think that you know it all or that you don't need any improvement. Anybody can improve. I don't care if you've been doing it for 30 years. You can still improve in your techniques and the way you do things. And I would have went ahead and cleared this car in this video, put the primer sealer, the base coat, and the clear coat so we could do all three stages in this video, but there's actually an extra step that we're doing with this car, and that's putting, we're painting the word Mustang on there and putting some pin stripes and a stripe, so we really couldn't cram all that in this video. I mean, I really hate speeding it up like this, but I know usually if I have videos over 10 minutes, I get some people that give me negative feedback about that. I know most videos they want 10 minutes or less, it seems like, but it's just hard to cram all that in there. That's why we're just doing these two stages in this video. In this next video we're gonna show you how we did the stripes and the decals on this and painted all that. And this was our first time to use many of these Eastwood products. We used some of them, but not really the primers and base coat like this. It's basically the same techniques, but with different brands you may have to tweak what you do a little bit. I know we had to kinda learn as we go with the Eastwood products, and, I mean, it worked really well. It did an awesome job. But we did have to tweak a few things It just was not what we was used to. But as far as the product, the look, and how it turned out, totally awesome. I mean, it turned out really good. Well, there you have it. We've now got this car primer sealed. We've got it sealed, we got base coat on it, and now we are ready to put the stripes on in clear coat. Now, this base coat, it filled really good. Real good hiding. I mean, it laid on top, hid everything underneath really, really good. It did dry a little different. It's a little different than what we was used to, but whenever you see how this car turned out, you're gonna be amazed. It turned out really, really good. As always, I really appreciate you watching. If you have any comments, questions, be sure to leave 'em down in the comment section, and then we can all learn from each other. There's a lot of different ways of doing things out there. I always enjoy reading when someone has different methods. Maybe it's a tip or a trick that we don't know about. Be sure and leave us comment down there. We can all get better through each other, reading each other's comments. But don't ever think that you know everything or that you can't learn anything, 'cause I guarantee you I still learn, and some of it's from students that know nothing about this. They'll say something, bring it to my attention, and I'll think about it. Now, some of it's, "No, that won't work," but some of it's like, "You know what? "Let's give it a try." So, I'm all about trying new things and experimenting, and I think the best painters out there are probably the same way. And if there are painters our there watching these videos, I know there are some professional painters, that's probably why they're watching these videos. They just like to see different techniques different people do, and that's what I did for years. I worked at a lot of shops and dealerships and things like that, and I just liked to pick up on all the different ways things are done and then develop my own way of doing things. But I'm always willing to learn something. I always like to see something new, if something that can be done faster, be done better. I'm always interested to learn those things. But anyway, thank you all for watching. If you like this video, be sure and give us a thumbs up. And if you have any questions or comment, leave 'em down there, and we will see you in the next video. Take care. And if you'd like to subscribe, just click the button right there. Or if you wanna watch the entire playlist of the Eastwood video series that we've got to to this point, just click on the video.


Be the First to Respond
Share Your Thoughts